phpMyAdmin is a web-based tool that provides a graphical interface for managing MySQL and MariaDB databases. This guide walks you through installing phpMyAdmin on CentOS 7, enabling you to manage databases through your browser instead of the command line. The installation requires setting up Apache, configuring the EPEL repository, and adjusting access permissions.
Background
phpMyAdmin is essential for users who prefer not to work with the MySQL command line interface. It supports a wide range of database operations including table management, user administration, and direct SQL statement execution. The tool has been translated into 72 languages and supports both LTR and RTL text directions.
Key Features
- Display multiple result sets from stored procedures and queries
- Create, browse, edit, and drop tables, databases, columns, views, and indexes
- Copy, rename, and alter database structures
- Server maintenance with configuration suggestions
- Upload text files into tables
How to Install phpMyAdmin on CentOS 7
-
Step 1: Connect to Your VPS
Connect your PC to the VPS server via SSH before beginning the installation.
-
Step 2: Install Apache Web Server
Install the Apache web server using the following command:
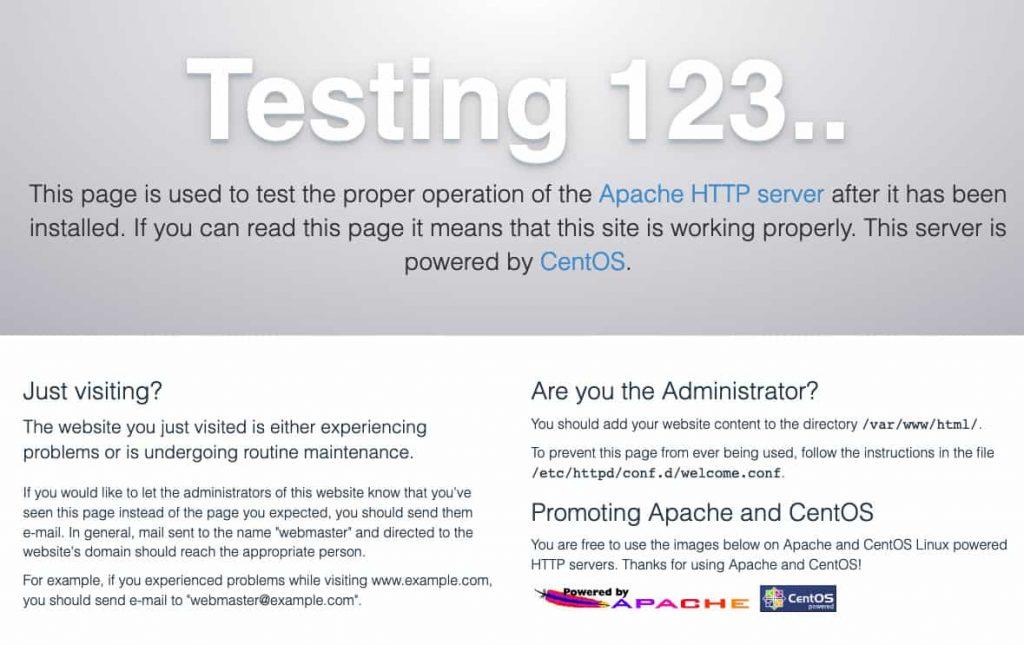
yum install httpd -yCheck Apache status:
systemctl status httpdVerify Apache is working by navigating to your server's IP address in a web browser. You should see the Apache test page.
-
Step 3: Install the EPEL Repository
phpMyAdmin is available in the EPEL repository (Extra Packages for Enterprise Linux). Install the epel-release package to access EPEL:
sudo yum install epel-release -
Step 4: Install phpMyAdmin
Run the following command to install phpMyAdmin:
sudo yum install phpmyadmin -
Step 5: Configure phpMyAdmin Access
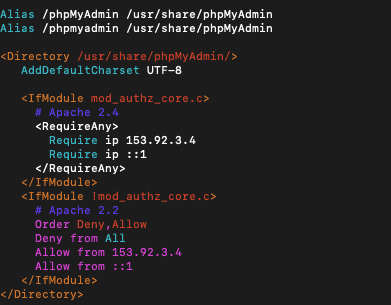
Edit the phpMyAdmin configuration file to enable remote access. Open the file using vim:
vim /etc/httpd/conf.d/phpMyAdmin.confFind the four instances of
Require ipstrings. The default value is127.0.0.1. Change this to the IP address of the machine you will use to access phpMyAdmin (e.g.,192.168.xxx.yyy). You can check your IP using a tool like WhatsMyIP.Press
Escand type:wqto save and exit the file. -
Step 6: Restart Apache
Restart the Apache web server to apply the configuration changes:
systemctl restart httpd -
Step 7: Access phpMyAdmin
Open your web browser and navigate to your server's IP address followed by
/phpmyadmin:http://your-server-ip/phpmyadminYou will see the phpMyAdmin login screen.
-
Step 8: Find Your Login Credentials
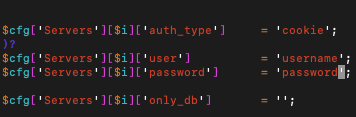
Check your username and password in the
config.inc.phpfile located in the phpMyAdmin installation directory at/etc/phpMyAdmin. Open the file with vim:vim /etc/phpMyAdmin/config.inc.phpLocate the username and password as shown in the configuration file.
Press
Escand type:wqto save and exit.
Conclusion
You have successfully installed phpMyAdmin on CentOS 7. Once logged in, you'll see a user-friendly dashboard for managing your MySQL or MariaDB databases. phpMyAdmin requires no database administration experience and provides an intuitive solution for common database tasks.