This guide shows you how to add a database connection string to your web.config file in Plesk. Connection strings allow your ASP.NET application to connect to SQL Server or other databases by storing credentials and server information in a central configuration file.
How to Add a Connection String
-
Step 1: Log in to Plesk
Access your Plesk control panel with your credentials. Enter your username and password in the login fields provided on the Plesk login page.
-
Step 2: Open File Manager
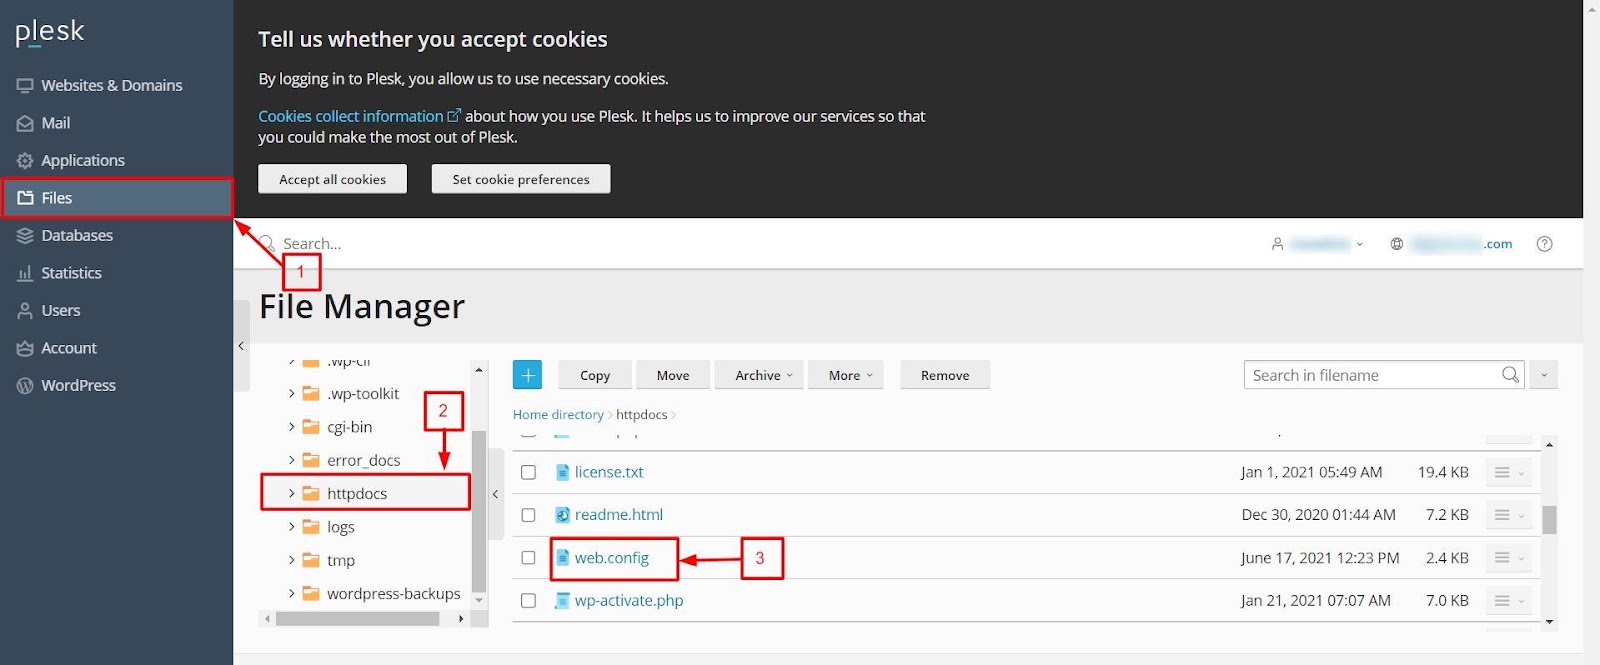
Once logged in, locate the Files option in the left-hand menu. Click on it to access the File Manager interface where you can manage your website files.
-
Step 3: Navigate to web.config
In the File Manager, navigate to the
httpdocsfolder. This is typically where the root directory of your website is located. Look for theweb.configfile and click on it to open. If you do not see aweb.configfile, you may need to create one. -
Step 4: Insert the connection string code
In the Code Editor window, locate the
<configuration>section. Within this section, you will need to insert a new<connectionStrings>element if it does not already exist. Then add your specific database connection string inside it as shown below:<connectionStrings> <add name="ConnectionString" connectionString="Data Source=SERVER_IP;Initial Catalog=DBname;User Id=DBuser;Password=DBuser_password;" providerName="System.Data.SqlClient" /> </connectionStrings>Replace
SERVER_IP,DBname,DBuser, andDBuser_passwordwith your actual database server IP address, the name of your database, your database username, and your database password respectively.Note: If you are connecting to a SQL Server instance that is not running on the default port (1433), you will need to include the port number in the Data Source like this:
Data Source=SERVER_IP,PORT_NUMBER;. -
Step 5: Save the file
After making the necessary changes to your connection string, it is crucial to save the modifications. Look for a Save button or option at the top of the Code Editor and click on it to apply the configuration changes.
Tips:
- Ensure that your database server is accessible from the web server where your application is hosted. Firewall rules might block connections if not configured correctly.
- For security reasons, avoid using an administrator account for database access. Create a specific user with only the necessary permissions.