Creating a database alone is insufficient. To effectively manage and deploy it for your website, you need to add a database user as well. With Webuzo, adding or creating a database user for your existing databases is a straightforward process that takes just a few clicks. This guide will walk you through the steps with additional details to ensure you set up your database user correctly.
How to Add/Create a Database User
-
Step 1: Log in to Webuzo
Log in to your Webuzo user account using the credentials provided by Internetport. If you have not received these, please contact our support team for assistance.
-
Step 2: Navigate to Database Management
Once logged in, locate and click on the "Database" section from the main menu. This will bring you to the database management dashboard. From here, click on "Manage Databases." This page lists all the databases associated with your account.
-
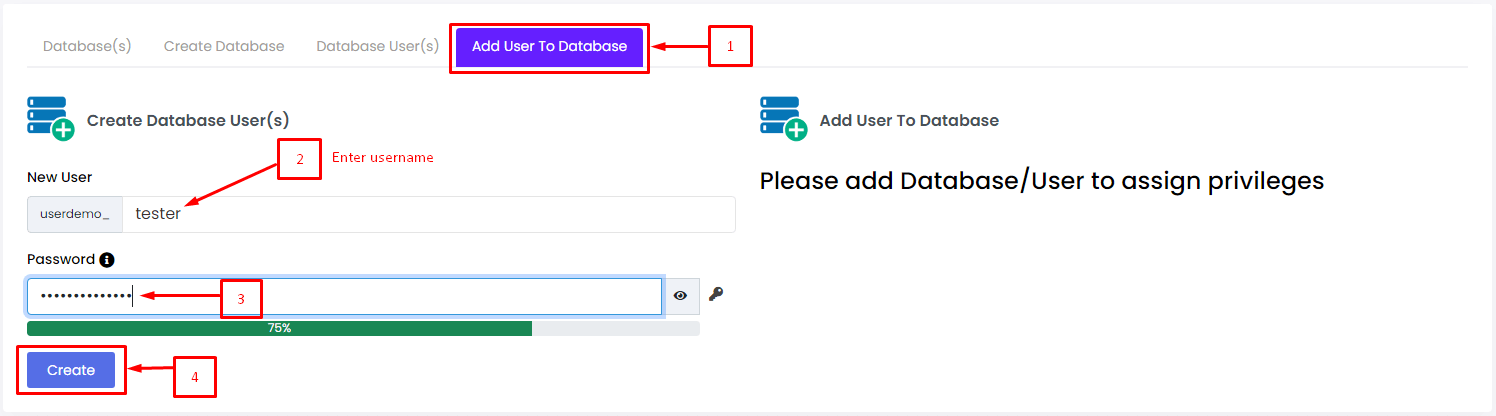
Step 3: Select Add User To Database
In the "Manage Databases" section, you will see several tabs. Look for and click on the "Add User To Database" tab. This action will take you to a form where you can create a new database user.
The form for "Create Database User(s)" will be presented, allowing you to input necessary details for the new user.
-
Step 4: Fill in User Details
To proceed, you need to complete the following fields:
- New User: Input a unique username for the database user. It's important to choose a strong and memorable name that follows best practices for security.
- Password: Generate or enter a secure password. Webuzo usually provides an option to generate a random, strong password. If you prefer to create your own, ensure it includes a mix of uppercase letters, lowercase letters, numbers, and special characters.
In addition to the above fields, you may also need to select which database this user should have access to. Use the dropdown menu to choose the appropriate database from the list of existing databases.
-
Step 5: Create the User
After filling in all necessary details, click on the "Create" button at the bottom of the form. This action will submit your request to create a new database user.
Upon successful execution, a confirmation message will appear on the screen, signifying that Webuzo has created the database user and added it to its list of users. This confirms that your new database user is ready for use.

Tips:
- Always keep a record of your database usernames and passwords in a secure location.
- Regularly update your database user's password to enhance security.
- If you encounter any issues during the process, refer to Webuzo's help documentation or contact Internetport support for assistance.