As a cPanel server administrator, you can create hosting packages in WHM to define resource limits and settings for your users. Packages allow you to standardize configurations and quickly provision new accounts with predefined quotas for disk space, bandwidth, databases, and other features. By setting up packages, you ensure consistency across all user accounts and simplify the management of resources.
How to Add a Package
-
Step 1: Access WHM
Log in to your root WHM account using your credentials. Ensure you are accessing the correct server by checking the URL and domain information.
-
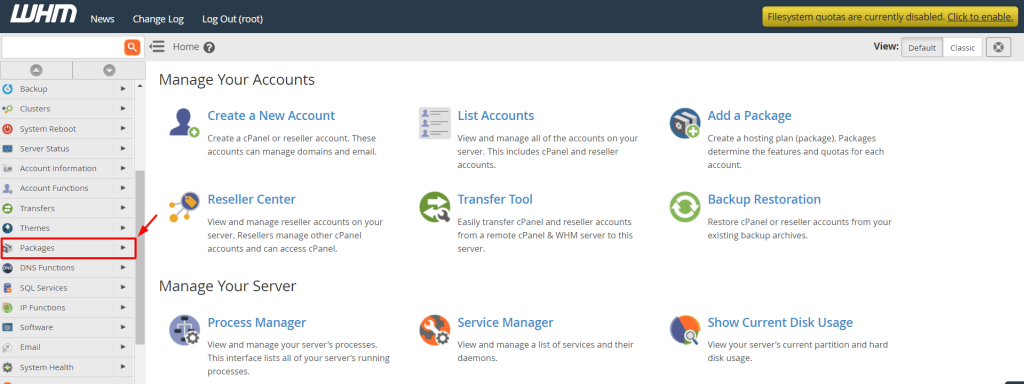
Step 2: Navigate to Packages
Once logged in, locate the Packages option from the navigation menu on the left-hand side. Clicking this will expand a list of package-related options.
-
Step 3: Open Add Package Form
In the expanded list under the Packages section, click on the Add a Package option. This will direct you to a form where you can specify all necessary details for your new package.
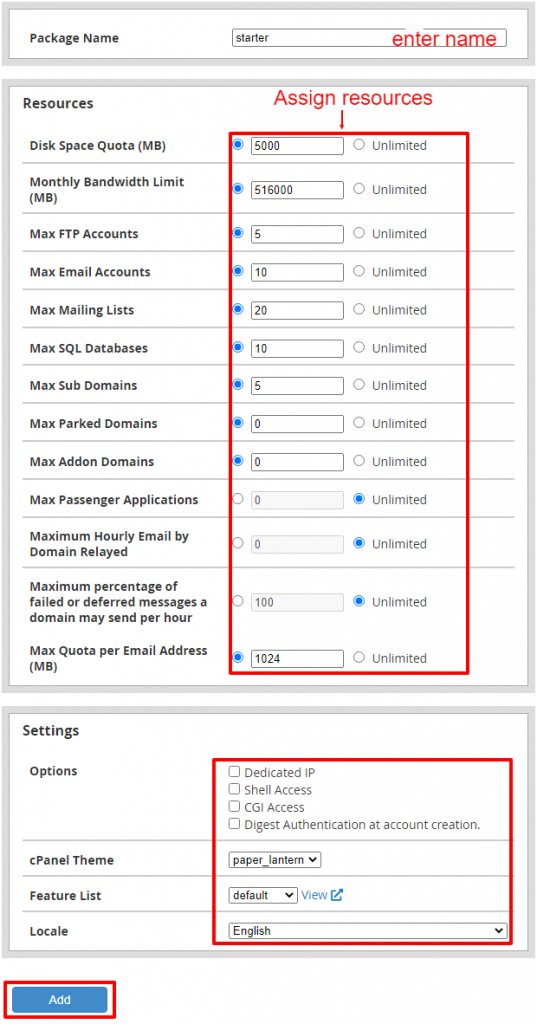
A form displaying options to specify resources and settings for the package will appear.
-
Step 4: Configure Package Name
In the first field, enter a descriptive Package Name. This name should reflect the intended use or characteristics of the package to make it easily identifiable later. For example, you might name it "BasicPlan" or "DeveloperPackage".
-
Step 5: Set Resource Limits
Scroll down to the Resources section of the form. Here, you can set quotas for various resources:
- Disk Space: Enter the maximum amount of disk space (in MB) that accounts with this package can use.
- Bandwidth: Define the monthly bandwidth limit (in GB).
- Email Accounts: Specify the number of email addresses allowed per account.
- Databases: Set the maximum number of databases that can be created.
-
Step 6: Configure Package Settings
In the Settings section, you can configure additional options:
- Dedicated IP: Check this box if users should have a dedicated IP address.
- Shell Access: Enable or disable shell access for security reasons.
- CGI Access: Allow or disallow Common Gateway Interface (CGI) scripts.
- Digest Authentication at account creation: Choose whether to enable digest authentication when new accounts are created.
-
Step 7: Save the Package
After configuring all necessary settings, click the Add button at the bottom of the form to save your new package. A confirmation message will appear indicating that the package has been successfully created.

You can use this process to add any new package for your WHM hosting accounts. Remember to regularly review and adjust your packages as needed to meet the evolving needs of your users.